Autodesk Maya is a powerful tool for 3D modeling, animation, and rendering—but it can feel a bit tricky when you're just starting out. Here’s a beginner-friendly guide to the most common mistakes in Maya, and how to avoid them—step by step!
Step 1: Always Set the Project First
Mistake: Not setting a project folder before starting.
What Happens: Textures don’t load, files get lost, and render paths break.
Fix: Go to File > Set Project, choose your folder, Refer to Image 1, and then File > Project Window to organize scenes, images, etc. Refer to Image 2.
Pro Tip: This keeps everything (scenes, renders, textures) in one place.
Step 2: Save Incrementally
Mistake: Saving over the same file.
What Happens: If Maya crashes, you lose work.
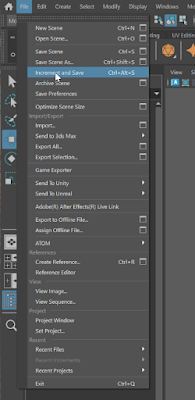
Fix: Use File > Increment and Save or save manually like car_model_v01.mb, v02.mb, etc. Refer to Image 3.
Why: It’s a lifesaver if you need to go back.
Step 3: Use the Right Viewport Renderer
Mistake: Using the wrong viewport setting.
What Happens: Lights or textures may not show.
Fix: Switch to Viewport 2.0 for the best real-time preview.
How: Go to Renderer > Viewport 2.0 at the top of the viewport. Refer to Image 4.
Image 4
Step 4: Don’t Freeze Transformations Too Early
Mistake: Applying Freeze Transformations before your model is in final position.
What Happens: Animation becomes harder and your pivot point gets messed up.
Fix: Only freeze transforms once you're done modeling and before rigging—not too early.
Step 5: Always Delete History Before Exporting
Mistake: Leaving construction history on.
What Happens: Scene becomes heavy, slow, or even corrupt.
Fix: Go to Edit > Delete by Type > History after modeling or duplicating. Refer to Image 5.
Pro Tip: Do this regularly to keep Maya running fast.
Image 5
Step 6: Organize with Layers and Naming
Mistake: Leaving objects as pCube1, pSphere2, etc.
What Happens: It becomes confusing with many objects.
Fix: Double-click to rename each object clearly (like chair_leg_L). Use Display Layers to organize.
Extra Tip: Use Outliner window to keep track of everything. Refer to Image 6.
Image 6
Step 7: Don’t Ignore Units and Scale
Mistake: Working in default units without checking.
What Happens: Scaling and animation can behave weirdly, especially in game exports or 3D printing.
Fix: Go to Windows > Settings/Preferences > Preferences > Settings, and check Working Units (e.g., centimeters for 3D print). Refer to Image 7 and Image 8.
Image 7 Image 8
Video: Liquid Simulations in Autodesk Maya | Tutorial
📘 Further Reading
Autodesk Maya 2025 with Videos: A Tutorial Approach by Mable Thomas - Learning resource packed with video tutorials designed for users at all levels—from beginners to advanced.
Autodesk Maya 2025: A Comprehensive Guide, 16th Edition offers in-depth coverage of 3D modeling, texturing, rigging, animation, and rendering using Maya 2025. Designed for students, educators, and professionals, this guide follows a practical, step-by-step approach and includes hands-on tutorials, detailed examples, and self-evaluation tools to support learning. Whether you're a beginner or looking to sharpen your skills, this book is your go-to resource for mastering Maya.


No comments:
Post a Comment